
Overview
A custom keyboard replaces the system keyboard for users who want capabilities such as a novel text input method or the ability to enter text in a language not otherwise supported. Users enable your custom keyboard in Settings, which allows them to access your keyboard systemwide wherever third-party keyboards are supported.
Note
If your keyboard is specific to your app, use a UIInputView instead of creating a custom keyboard. Set the inputView property of text fields or text views to a view that should replace the system keyboard.
Creating a custom keyboard requires several steps. In addition to adding a Custom Keyboard extension target to your project, you have to configure options, implement your custom interface, and decide what text interactions to support. Users expect a variety of common keyboard interactions such as autocorrection, autocapitalization, smart quotes, and more.
Add a Custom Keyboard Target to Your App
The Custom Keyboard Extension template provides a starting point for you to build your keyboard extension. Xcode configures your project to build the extension and includes it in your app’s bundle.
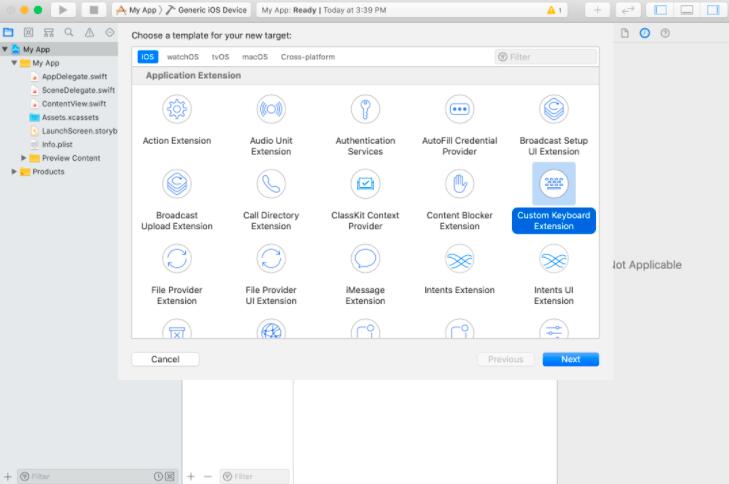
Open your app project in Xcode.
Choose File > New > Target.
Select Custom Keyboard Extension from the Application Extension group.
Click Next.
Specify the name of your extension and configure the language and other options.
Click Finish.
Make sure the Display Name field in the General tab of your keyboard target accurately describes your keyboard. The Settings app uses this value in the list of third-party keyboards.
If you support multiple languages that require different keyboard layout or functionality, repeat the steps above to add additional custom keyboard targets for each language. Set the PrimaryLanguage value accordingly in each of the target’s Info.plist files.
Configure Information Property List Options
If applicable to your custom keyboard, edit the keyboard extension’s Info.plist to configure the following options:
IsASCIICapableSet this to true if your keyboard is capable of generating standard ASCII characters.
PrefersRightToLeftIf your keyboard primarily supports right to left languages, or if the insertion cursor should default to the right when editing in a text field, set this to true.
PrimaryLanguageSet this to a string representing the primary language your keyboard supports. Use a two-character code like nl for Dutch, or language and country code such as nl-BE for Dutch in Belgium. The Settings app displays the primary language in the list of keyboards.
RequestsOpenAccessSet this to true if your keyboard needs access to network resources, to write to a shared group container, or other capabilities. For more information, see Configuring Open Access for a Custom Keyboard.
Set these keys in the NSExtension > NSExtensionAttributes dictionary of the Info.plist file:
Add Your Custom User Interface
When the user activates your keyboard, it replaces the system keyboard. Your custom keyboard extension’s principal class provides the view that is displayed. By default, Xcode’s custom keyboard template configures a class named KeyboardViewController as the principal class. This controller’s view is where you define your user interface.
Tip
For design guidance, see Human Interface Guidelines > Custom Keyboards.
When designing your keyboard’s user interface, incorporate a button to switch keyboards. The system keyboard uses a button with a globe icon as shown in Figure 4.
Use UIInputViewController’s needsInputModeSwitchKey property to determine if you should display a button to switch keyboards. If the user has only one keyboard enabled, there’s no need to show a keyboard switching interface. On iPhones with Face ID, iOS automatically shows the globe icon below your keyboard view and sets this property to true, indicating that you shouldn’t show your button.
Configure your keyboard switching button with an action targeting the handleInputModeList(from:with:) method of your input view controller subclass. The default custom keyboard template does this by adding an action to the button:
nextKeyboardButton.addTarget(self, action: #selector(handleInputModeList(from:with:)), for: .allTouchEvents)
Using allTouchEvents allows the system to automatically show the keyboard list picker when the user long presses the button.
Your keyboard should also be flexible with the layout because the width of the keyboard can vary, even while it’s currently on screen. All keyboards should support both compact and regular widths and allow for transitioning between the two. Test your keyboard in portrait and landscape orientations, and on iPadOS be sure to test your keyboard in a floating view.
Handle Text Interactions
Custom keyboards run in an isolated process that doesn’t have direct access to the text input view. UIInputViewController provides a textDocumentProxy property allowing your keyboard to access the text input view. You use this proxy to get the selected text, insert or delete text, manipulate the text insertion position, and get surrounding textual context in order to support things like autocorrect or autocomplete.
// Insert a string into the text input view.textDocumentProxy.insertText("Hello world.")
// Get the currently selected textlet selectedText = textDocumentProxy.selectedText
Debug Your Custom Keyboard
Debugging a custom keyboard is similar to debugging any app extension. Xcode prompts you to choose a host app to launch, then you begin editing text in that host app in order to invoke your custom keyboard. The host app can be any app available in the run destination, including your app that contains the keyboard extension.
Select the build scheme for your keyboard extension target and a run destination (simulator or device).
Select Product > Run to begin your debugging session.
Xcode prompts you to select a host app. Choose an app that allows text input, like Notes. Xcode builds and installs your app with its keyboard extension, then launches the app you selected.
After the host app launches, begin editing a text field. The most recently used keyboard is shown.
Touch and hold the globe button to display the list of available keyboards. Choose your app’s keyboard.
iOS launches your keyboard extension in its own process, and Xcode attaches a debugging session to it. You can now set breakpoints and perform normal debugging tasks in your extension code.
Important
If your keyboard isn’t available in the list of active keyboards, you have to enable it. In Settings, navigate to General > Keyboard > Keyboards and select Add New Keyboard. Choose your keyboard(s) from the list of third-party keyboards.
Limit Memory Usage
Your custom keyboard code executes in a separate process, and that process has a limit on the amount of memory it may use. If your keyboard extension exceeds the memory limit the system terminates it. Here are some tips for managing memory efficiently:
Test your keyboard on various device models. The memory limits vary from model to model.
Be sure to handle low memory notifications. Release any resources that aren’t strictly necessary.
Keep in mind that dismissing the keyboard won’t necessarily terminate the keyboard extension process. Don’t assume the system releases memory your keyboard is using when it is no longer visible on screen.
For more information on crash logs related to memory usage limits, see Diagnosing Issues Using Crash Reports and Device Logs and EXC_CRASH (SIGQUIT).


